Scroll past video for content
SolidWorks users who work with weldments often spend a significant amount of
time creating and applying the proper corner treatment to structural members
that meet at a common vertex. Applying corner treatment is a fairly
straightforward procedure for structural members of the same group, and can be
adjusted through the structural member Property Manager. However, when
multiple groups meet at the same vertex, a trim order is established, with the
second group automatically trimming with respect to the first group, the third
group with respect to both the first and second groups, and so on. This trim
order can be adjusted to force groups to trim simultaneously, allowing for the
creation of complex corner treatments and greater flexibility in designs.
We’re beginning with a relatively simple 3D sketch as shown below. To add
structural members, activate the weldments tab and choose Structural Member,
specify your weldment profile standard, type, and size, and choose the
appropriate sketch segments for each group. In this example, all of the
members will use the same weldment profile and size, so only a single
structural member feature is required. Groups must consist of sketch segments
that are contiguous (touching end to end) or parallel, and were created
according to the colored illustration below:
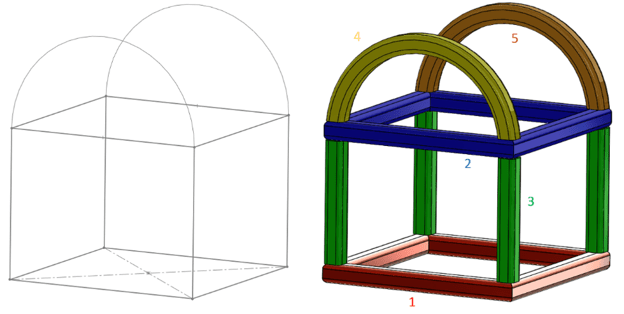
1 – 3D Sketch and Color-coded Structural Member Groups
Having created these groups, you’ll find that some default corner treatments
are automatically applied. Within Group 1, members are trimmed with a 45°
miter. This can be adjusted to an end butt configuration if desired through
the Property Manager, but this is the only other option. Group 3 is then
trimmed with respect to Group 1, shortening the member as needed in order to
fit. This is because of the trim order that has been established, and this
order can be changed by editing the Structural Member feature and selecting
the vertex where the three members meet.
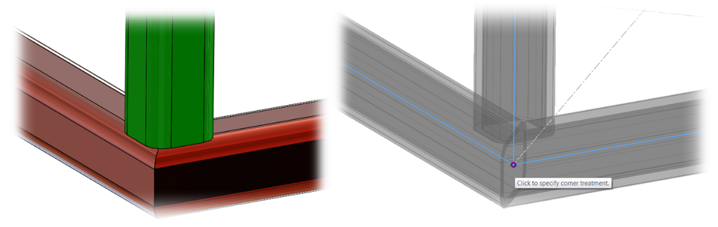
Structural Member Groups 1 and 3; Selecting the Vertex to Adjust Trim Order
At this point, a Corner Treatment dialog will appear with the current trim
order of all involved groups (two in this case). To force both groups to trim
simultaneously, set the trim orders equal. For this specific vertex, it
doesn’t matter whether the order is set to 1 or 2, as long as they are
consistent; however, this may have impacts downstream when trimming with
respect to other groups, so it’s important to be aware of the implications of
changing trim order. The result is a three-way miter between the three
structural members, which is impossible to achieve without adjusting the trim
order.
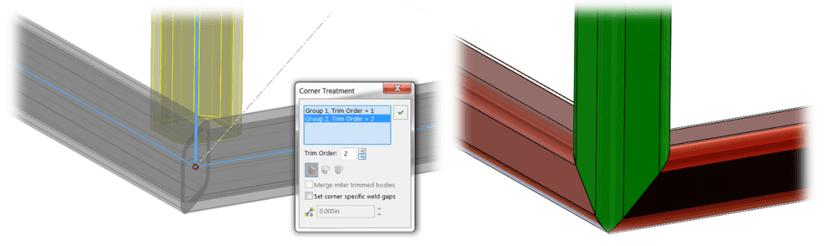
Corner Treatment Dialog and the Result of Setting Both Groups to the Same Trim
Order
The concept of setting trim order can be extended to vertices with more than
three structural members as well, and this can be accomplished using the same
strategy. At the intersection of Groups 2, 3, and 4, the trim order has been
set to 1 for all groups, and the result is a four-way miter that is impossible
without adjusting trim order.
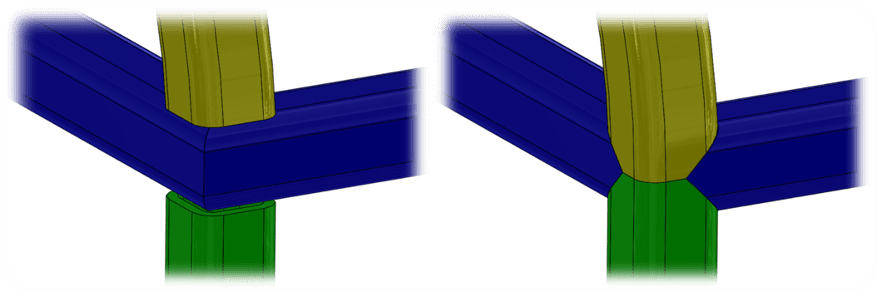
Trim Order Set Equal for Groups 2, 3, and 4 (Before and After)
Adjusting the trim order for weldment structural members is a quick and
powerful way to achieve the exact design intent you’re looking for when
working with weldment designs, and allows you to create some pretty
interesting and aesthetically pleasing corners. Try it out, and let us know
what you think. Happy modeling!


Thanks a million! I had to re-adjust the group sequence in a part with a dozen configurations. Removing the first groups and re-adding them would’ve given me a shitload of errors which are always a challenge to solve. Switching the group sequence did the trick with the least amount of damage! Thank you!