Do you typically use the Standard mesh, or the Curvature based mesh when
preparing to run a study? I personally tend to favor the Curvature based mesh
over the Standard mesh when setting up studies in
Simulation. I’m often asked what the difference is between the two and why I prefer the
Curvature based method. While the topic of discretizing or meshing can get
highly technical and easily cover several whitepapers, I wanted to highlight a
couple of main points in this article.
Let’s begin our discussion with the Standard mesh. The Standard mesh lets us
specify a Global Element Size and a Tolerance value. It makes use of
Voronoi-Delaunay triangulation, which tries to maximize the smallest angle of
all triangles, while the geometry is being split into element triangles or
tetrahedrons. In essence, the Standard mesh tends to avoid skinny triangles
and hence helps reduce the number of elements with a high aspect ratio, which
can affect the accuracy of our results. The Standard mesh does a great job of
creating a uniform and reliable mesh.

During the Standard meshing process, faces are meshed first. The software
attempts to fill each face with equilateral triangles with the size equal to
the specified element size. Edges of the faces are maintained while the
specified tolerance value is used to knit the surface meshes into a solid.
Once the faces are meshed and knit, the volume is filled with tetrahedrons.
During the volume filling phase, the Standard mesh is able to take advantage
of multi-core processors to help minimize the time required to mesh the
geometry.

The Curvature based mesh on the other hand, supports both multi-core surface
and volume meshing. Hence many tend to favor the Curvature based mesh for a
complex part or assembly analysis as it generally performs better than the
Standard mesh, by taking greater advantage of multi core processors.
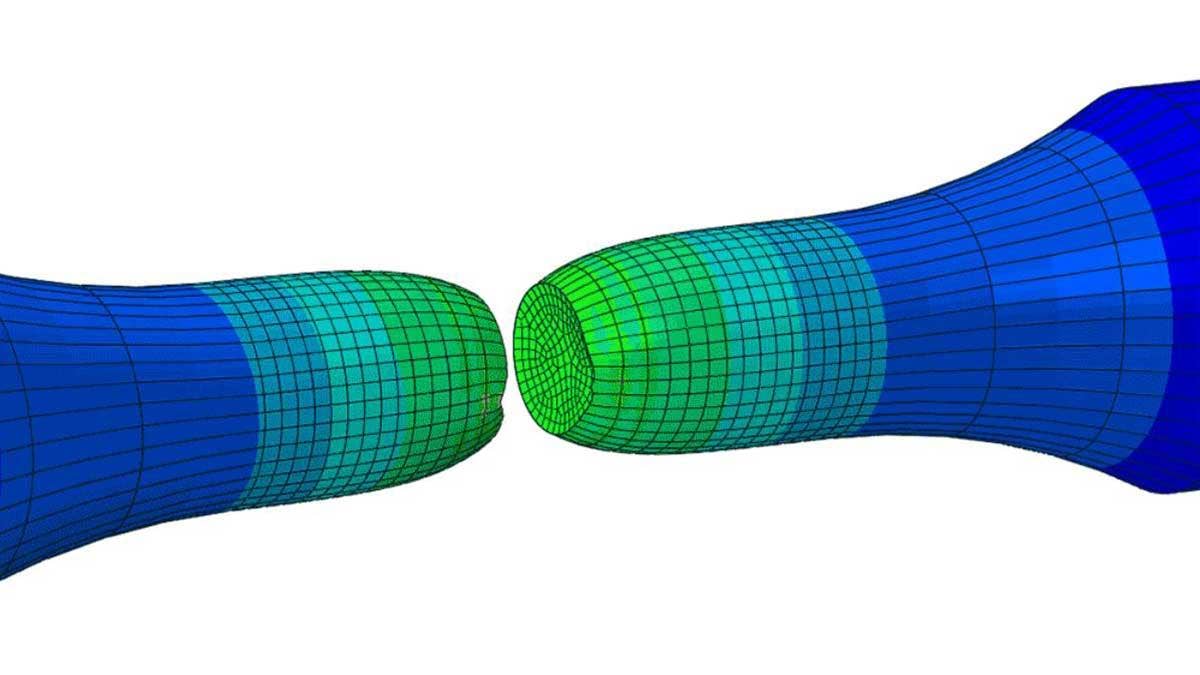
With a Curvature based mesh, the element size is determined mathematically by
the minimum number of elements that fit in a hypothetical circle, while taking
into account the user specified minimum and maximum element size. In the
figure below, the default value of 8 for the minimum number of elements in a
circle is used, so the red arc would contain 2 elements. If we increased the
value to 16, the red arc would contain 4 elements, as long as the h value is
between our specified min/max element sizes.

The ability to define both minimum and maximum element sizes allow for a more
robust mesh that “adapts” to the geometry by using smaller elements where the
curvature is highest. Therefore, when meshing complex geometry or assemblies
with a large variance in part sizes, this mesh type typically requires much
less effort and fewer mesh controls are needed for the mesh to be successful.
Meshing multi-body parts or assemblies using an incompatible mesh is one
particular scenario where a Curvature based mesh truly excels. Using an
incompatible mesh increases the success rate of both the Standard and
Curvature based methods, as the mesh isn’t forced to merge nodes between
bodies. One item to note about the Standard mesh is that it allows engineers
to apply mesh control on vertices, while a Curvature based mesh ignores mesh
control applied on vertices.
While there is no right or wrong choice between the Standard and Curvature
based methods, I’ve found myself leaning more towards a Curvature based mesh
due to the higher rate of success and efficiency. Comparing the time required
to mesh approximately 500,000 elements in a simple body, the Curvature based
mesh is more than twice as fast as the Standard mesh. For this example it took
21 seconds using a Curvature based mesh versus 49 seconds using a Standard
mesh.

Whichever mesh type you choose, it is important to keep element aspect ratios
in mind and review your Mesh Quality plots. A general rule of thumb from the
Simulation Training manual is to keep the aspect ratio below 50 in areas where
stress is of crucial importance. Although the Standard mesh typically does a
better job of avoiding high aspect ratio elements, my experience has shown the
Curvature based mesh does a great job of avoiding aspect ratio issues as well.
Note the Maximum Aspect Ratio from the example above, the Curvature based mesh
has a lower value compared to the Standard mesh.
This article only scratches the surface on the topic of meshing. For a more in
depth discussion on meshing, be sure to check out our eLearning video tutorial
The Art of Meshing.


Great entry! But in the last paragraph you state that the aspect ratio should be held under 50. Is this a typo? I have herd others state the ratio should be held under about 5 to obtain sufficient acurracy.
Thanks!
Jens – I do agree with you – SOLIDWORKS actually reports on the number of elements with AR<3 as one of the primary quality metrics for mesh, and I try to keep elements fiar. We've taken the 50 value straight from the SOLIDWORKS Simulation training manual – but it may be a typo there. If in doubt, improve the mesh, and see if your results change more than an amount that you care about.