In this series, I will use SOLIDWORKS to design a keezer for use in delivering
cold homebrewed beer from several kegs at a time. The goal is to design and
eventually build the best delivery system possible to meet our requirements.
One could even say that we will be following an adventure in beer engineering.
The following will be in store:
Part 1: Requirements & Modeling – Setting design requirements and using SOLIDWORKS to model
all the core parts.
Part 2: Layouts & Equipment Selection – Putting all the pieces together to select the optimal
equipment for the project.
Part 3: Framing the keezer – Using SOLIDWORKS Weldments to turn it into a wooden work of art perfect
for any rec room.
Part 4: Connecting our Lines – Using Piping & Tubing to connect all the beer line in addition to CO2
line components.
Related YouTube Videos:
Global Variables and Configurations
Welcome back to Oktoberfest at Hawk Ridge Systems. In Part 2 of this design
series we will be taking the models we built in Part 1 to develop some keg
layouts. These layouts will be the basis of our equipment selection for an
optimal deep freezer, considering the requirements we established.
1.0 Analysis – Doing the Keg Layouts
We have everything we need to analyze this and turn SOLIDWORKS into a beer
science tool now. My preferred method is to setup an assembly for one size
which includes configurations for my “nice to have” options. Then I will do a
save as and reconfigure the kegs as the freezer size changes. I’m choosing to
do this over configurations simply because my assembly relationships may
change drastically between freezer sizes, and this will be far cleaner. Let’s
take a look at each of these.
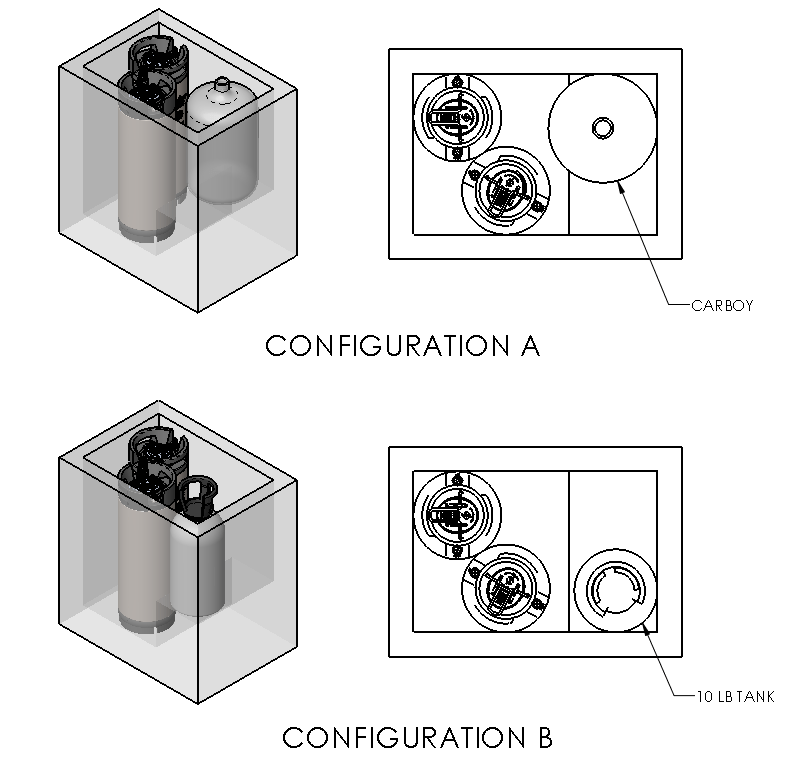
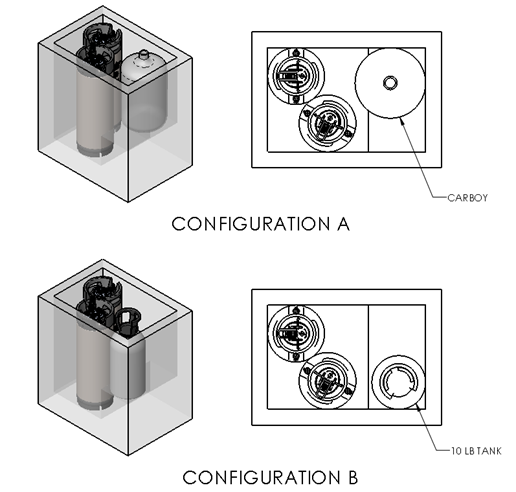
1.1 Kenmore 5.1 cu. Ft
This one has two possible configurations:
– 2 kegs, 1 carboy
– 2 kegs and a 10 lb. CO2 tank
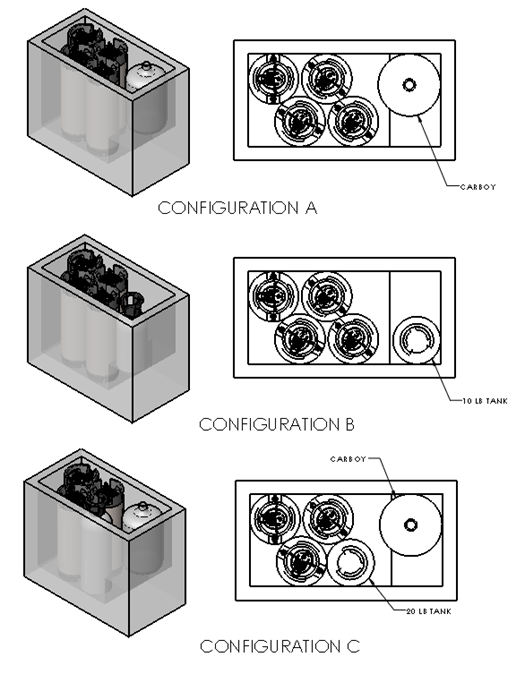
1.2 Kenmore 7.2 cu. Ft
There are three possible configurations to consider:
– 4 kegs, 1 carboy
– 4 kegs and a 10 lb. CO2 tank
– 3 kegs, 1 carboy and a 20 lb. CO2 tank
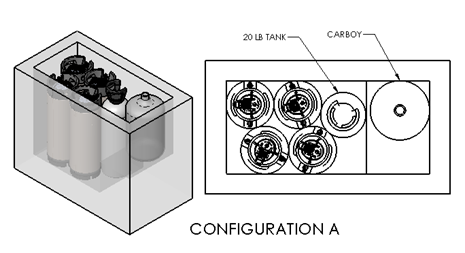
1.3 Frigidaire 9 cu. Ft
There is really only one option for this setup: 4 kegs, a carboy and a 20 lb.
CO2 tank. Unfortunately a 5th keg was just a bit too big to fit
into this freezer.
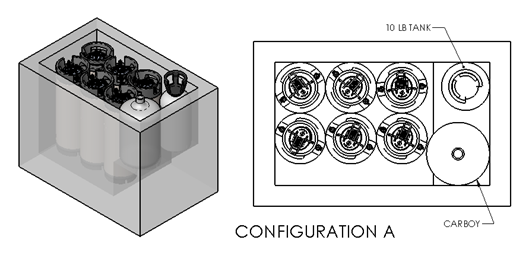
1.4 Frigidaire 11 cu. Ft
This one really only has one option as well: 6 kegs, a carboy and a 20 lb. CO2
tank.
2.0 Equipment Selection
With the layouts all done we can draw on a final decision here. So let’s
discuss each of the options.
The Kenmore 5.1 cu. Ft is not even close to meeting our requirements. For the
effort that will go into making this thing look nice I definitely can’t live
with just 2 kegs.
The Kenmore 7.2 cu. Ft actually doesn’t look too bad. My favorite option here
is Configuration B where I can have the smaller CO2 tank inside, and 4 kegs is
not too shabby of a capacity. However I prefer to think bigger and better, so
let’s keep looking.
Onto the larger Frigidaire units, the 9 cu. Ft really only offers one option.
And aside from the fact it only offers 4 kegs, I absolutely love that it can
house the larger 20 lb. CO2 tank and a carboy for lagering.
Lastly, the 11 cu. Ft Frigidaire is by far the largest due to its massive
depth. Again we have only one option, and that’s a whopping 6 kegs with a
small 10 lb. CO2 tank and also a lagering carboy. Of all the options we’ve
seen, this hits the nail on the head of every single design requirement and is
the unit I will proceed with in this design series. Unfortunately this was
also by far the most expensive chest freezer, but hey I never said it had to
be cheap right?
Before I bring Part 2 to a close, there is just one final thought here. When I
actually do sit down to build this I am very likely not going to buy this
freezer brand new. Realistically, I am going to do a lot of monitoring and
snipe one from a used for sale site such as Kijiji, Craig’s List, or some
other used auction listing. Luckily though because of how I setup the models,
when the time comes I can simply punch the dimensions into a new freezer
configuration and have a layout done in SOLIDWORKS within minutes!
Well thanks for joining us in to this second installment of Oktoberfest at the
Ridge. Stay tuned for our next piece in this series as we move on to framing
our freezer and doing all the wood working.