As you know,
SOLIDWORKS
is very good at giving us many options for performing certain tasks. A perfect
example of this is when it comes time to insert components into our assembly
models. Before reading further, do you know how many
different ways there are to accomplish this? Test your
knowledge and see how many you know!
Depending on the situation, these different methods can save you time, or are
just more convenient than other methods. Listed below are all of the different
ways to insert a component into an assembly:
-
Insert Component Command: This command can be found in the
CommandManager under the Assembly tab or in the pull down menus;
Insert<Component<Existing Part/Assembly. When you bring in your first
component just hit the check mark, and SOLIDWORKS will orient the component
origin onto the assembly origin (as well as aligning the 3 default planes).
For components after that, just click in the graphics area to place them so
they are not constrained.

-
Windows Explorer: You can browse to the location of your
part document, left click and hold, then drag into the graphics area of the
assembly to drop in the component. (Note: if your Origin is
visible in the assembly, drag your cursor to it and this will fix the
component’s origin to the assembly’s origin). This is especially helpful if
you like to work with your project folder open. Just make sure your folder
is active and in front of SOLIDWORKS, then drag and drop at will and throw
those parts into the open assembly document window! -
SOLIDWORKS Explorer: Use the search along the top to find
the model you want, then left click and hold and drag into the graphics
area.
-
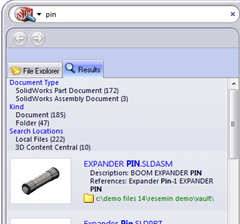
Search Files and Models: You can start to type in the name
of a document and they will populate in the task pane, from here you can
left click and hold then drag into the graphics area of the assembly.
(Note: this does not fix the components origin to the
assemblies origin.) Important: you must first tell
SOLIDWORKS where on your computer your files are located; this is found in
System Options -> File Locations -> Search Paths. For example, if you
save everything to C://Project then you can just add that top location for
SolidWorks to search that folder and any subfolders.
![]()
-
[Ctrl]+Left Mouse Button (LMB) from the FeatureManager Design
Tree: Say you already have the component/subassembly in the assembly, and you
need two of the same components or subassemblies. You can [Ctrl]+LMB click
and hold over the name of the component/subassembly in the FeatureManager
Design Tree and drag it into the graphics area to create a copy of this. It
doesn’t really create a true copy of the file on your hard drive; it just
creates another instance of the same component. -
[Ctrl]+LMB the Model in the Graphics Window: You can also
create copies of the components directly from the graphics window, same
concept as above. Just [Ctrl]+LMB on a face or edge of a component already
in the assembly and drag to another location in the graphics area and let up
on your mouse and you will create another instance of that component. -
Dragging from an open document window: You can LMB click
and hold on the modeled geometry and drag straight from one part document
window to your assembly document window. This also works from the Feature
Manager Design tree and the Configuration Tree if you want to bring in a
certain configuration. It helps to use the command Window -> Tile… (from
the Menu Bar at the top) to display multiple open documents at the same
time. -
Internet Explorer: You can even add a part from a
hyperlink, all you need to do is left click and hold over the hyperlink,
then drag your mouse to the graphics area of you assembly to drop that in.
OK, now how many of the eight methods did you know? Knowing your different
options can save you a great deal of time when it comes to setting up your
assemblies. Experiment and find the method(s) that work best for you!