Continued from SOLIDWORKS
Treehouse Part 1.
When using SOLIDWORKS Treehouse, it is even possible to have multiple
configurations of a part referenced in your tree. By hovering over the part or
assembly icon in the perspective tree, it will show hidden icons. In the top
left corner of the part or assembly that you are hovering over, an icon to
switch which configuration you are working in will appear. In order to switch
the configuration being used, just click on the icon and change to the proper
configuration in the menu that it supplies or use the add/ remove a
configuration option. Also, when hovering over these icons you may notice that
there is a document properties selection available. This selection will bring
up the Properties menu with information about the model, and allow the user to
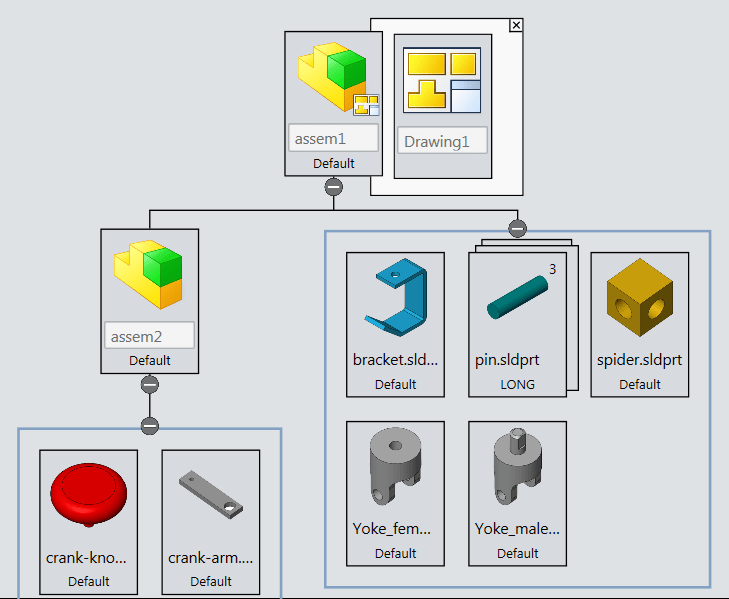
add comments. There is also a number in the top left of the part or assembly
icon, this is only shown while hovering over it with your mouse. This is the
area where you can edit the component count. For example, on something like
the grinder I was designing in the image below, it has multiple pins to hold
it together, so I changed the quantity to 3 and now Treehouse will put three
of these pins into the assembly automatically for me.

At any point in your tree hierarchy, if you want to add a drawing or a new
part to save a space for later, it is really easy to do. This will also start
a new file for you. Just click and drag on the perspective part or drawing
template, and drop it at the point in your assembly where it should be
referenced. For example, in the image below, you will notice I added a top
level assembly drawing to the very top of my tree.

It is important to note that SOLIDWORKS Treehouse is not actually creating the
proper assembly and drawings automatically with the parts that you provided.
Treehouse is an organizational tool to help make assembly management easier.
What Treehouse is doing is creating all of the files for your assembly and
linking them all together in your specified location. Because Treehouse does
this, when you start your assembly you will have all of the necessary parts
already available for you, and you will have all the drawing files opened and
referencing the correct level of your assembly (reference the image above).
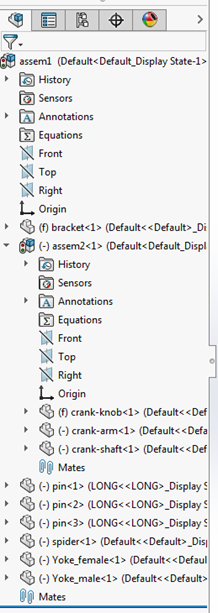
On top of that, inside the assembly, you will even have the Feature Manager
Design tree already organized properly in the correct structure that you set
(reference the image above). You can see in this assembly that I have one top
level sub-assembly and multiple parts, and then under the sub-assembly, I have
the parts necessary to create that. My entire feature manager design tree
structure has been created for me automatically (reference the image below).
When you are all done building your complete assembly structure, hit the icon
for export to SOLIDWORKS documents. This icon is in the toolbar right next to
the question mark help icon. Once you have selected Export to SOLIDWORKS
documents, you will need to select the destination folder for your assembly
files to be created in. Once this is done, SOLIDWORKS Treehouse will take over
and generate and open all of the necessary files in SOLIDWORKS with the proper
structure.
Keep an eye out for more great SOLIDWORKS content on the blog and subscribe to
our
YouTube channel.
If you would like to see a video on using this technique, click
here.