
Suppose you want to make a
SOLIDWORKS Universal BOM Template for mixed weldments which incorporates weldment
structural members but also sheet or plate and even purchased parts. Suppose
you also want to automate the BOM as much as possible to avoid manually
inputting data and have it update parametrically with changes in your
design… How do you accommodate the three different types of components so
that manufacturing knows which materials to use, and accounting can quickly
add up the material costs?
Using nested IF statements in your BOM columns, you can do just that. For the
BOM above, the only values which require manual input into the parts are Part
Number and Description. Description should already be defined at the profile
level for all of your structural members anyway. None of the cells are being
managed manually at the drawing level, which is as it should be for a
parametric CAD tool.
To do this, just create a weldment using structural members as you would
normally, but make sure that you are creating any sheet metal or plate parts
using the Base Flange/Tab in the Sheet Metal tool instead of a regular
Boss/Base Extrude. We also recommend that if you commonly use flat bar in your
designs that you create custom Weldment Profiles and create those parts as
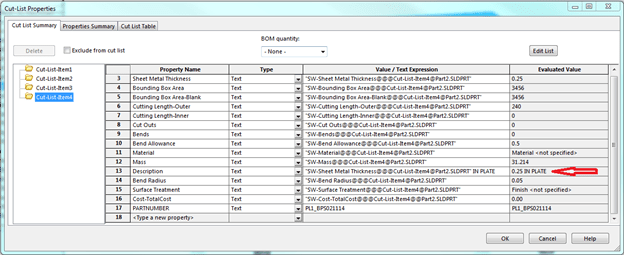
structural members. Update your cutlist, and give each cutlist body folder a
custom property called PART NUMBER. Description will automatically be filled
out for structural members, and for the plate components; we recommend copying
and pasting the Value/Text Expression from the Sheet Metal Thickness property
followed by your unit of measure and “PLATE”, so that the thickness updates
parametrically with design changes (see below).
Now, put your model into a drawing and add a
Bill of Materials
using the BOM-standard template that comes with SOLIDWORKS. For BOM Type,
select Indented with Flat Numbering and check the Detailed Cut List checkbox.
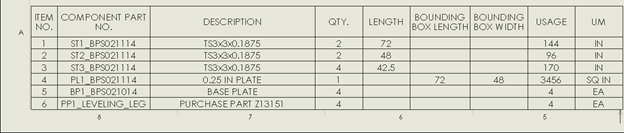
Right click the column header for QTY, and insert a column to the right.
Select “LENGTH” from the custom properties drop-down that appears. Repeat this
process to create columns for BOUNDING BOX LENGTH and BOUNDING BOX WIDTH.
Also create two more columns without selecting a custom property (just click
in the paper space when the dialog pops up) and title these USAGE and UM.
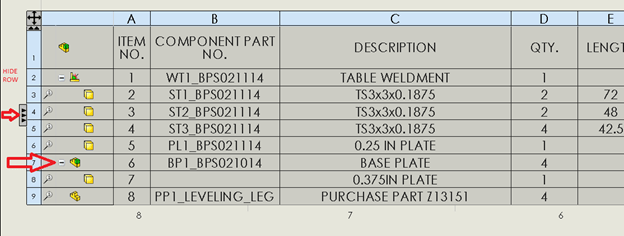
At this point, since we created an indented BOM instead of a weldment
cutlist, there will be a top-level row for your weldment file and any other
top-level components (if you are working with an assembly instead of a
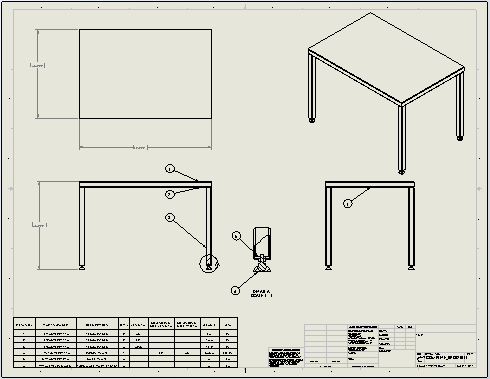
single part). The assembly used in this example consists of the main
weldment, threaded base plates and the leveling legs. If you want to keep
the top-level rows in your BOM and give them custom properties, remember
that these are coming from the file->custom properties menu, not the
cutlist since these are top-level components. Also, you can change the “flat
numbering” style we specified earlier to “detailed numbering”. This will
change the numbering scheme to 1, 1.1, 1.2, etc. for the top-level
components and all subcomponents.
If you don’t want these rows in your BOM, you can simply right click on the
row and hide it. Alternatively, you can expand the BOM with a left click on
the three arrowheads on the left and use the minus sign or dissolve command to
properly condense them.
If you have filled out all of the DESCRIPTION and PART NUMBER fields at the
model level, they should be correctly displayed on the BOM. QTY is also
calculated automatically. All of your structural members should have a LENGTH,
and all of your sheet/plate components should have a BOUNDING BOX LENGTH and
BOUNDING BOX WIDTH. (Note that you can use Bounding Box Area, too,
but we prefer length and width because this tells the fabricators the
dimensions for each piece.)
The last two columns are the real secret to the universal weldment BOM
template. Here we will be using a nested IF statement to differentiate between
the three component types. Left click on the column header above USAGE and
click on the summation sign (Σ). This will open the equation editor and we
will be applying the equation to the entire column.
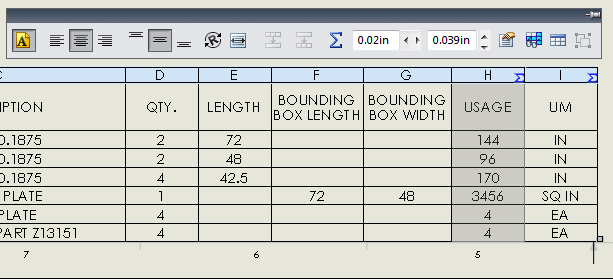
Enter into the equation editor:
IF(‘LENGTH’>0;’LENGTH’*’QTY.’;IF(‘BOUNDING BOX WIDTH’>0;’BOUNDING BOX
LENGTH’*’BOUNDING BOX WIDTH’*’QTY.’;’QTY.’))
This is telling SOLIDWORKS that if the component has a length, it is a
structural member and should calculate total usage based on the length times
the quantity. If it doesn’t, it is either a plate/sheet component, or a
purchase part. If it has a bounding box width, it is a sheet/plate component
and total usage is the length times the width times the quantity. If it’s
neither, it must be a purchased part, and we just report the quantity. We do
something similar for the Unit of Measure (UM) field. The equation for the
Unit of Measure is:
IF(‘LENGTH’>0;”IN”;IF(‘BOUNDING BOX WIDTH’>0;”SQ IN”;”EA”))
Here we are just outputting text values using the same test criteria. When
creating equations in SOLIDWORKS BOMS, it is easiest to use the drop-downs in
the equation editor, but if you want to create them on your own, notice that
Custom Properties are bracketed in forward apostrophes (`Custom Property`), a
Column is bracketed in regular apostrophes (‘Column Name’), and Text is
bracketed in quotations (“Text”).
The last step of course is to save your BOM as a template. Left click anywhere
on your BOM, right click on the black arrows in the top left of your BOM, and
select “Save as”. Save it as a SOLIDWORKS BOM Template (.sldbomtbt) somewhere
other than your install directory (so it doesn’t get written over with the
install of next year’s version of SOLIDWORKS), and it’s ready to use for all
your upcoming weldments.


Hello,
I try to reproduce this cool idea, but cannot solve.
Please, if possible, can send example files?
I SOLIDWORKS VAR in Lithuania :). Can find more about us in http://www.3dcad.lt 🙂
Thanks,
Andrej
Using a similar approach to yours, I have created a fully automated BOM/Works Order system with Excel.
All i do is paste the indented BOM for a full job into the Excel Spreadsheet and it does all the work for me. (Creates Plasma/Press List, Saw list, Bought-In List, Weldment List for manufacturing and Raw material List for purchasing)
Since I am the single employee in the office, it saves me a great deal of time.
My plan is to incorporate job costing in the near future.
Also i plan to translate the spreadsheet to a microsoft access database so i can control inventory and production like an mrp system (Except tailor made an free) 🙂
Have you ever done anything like that?