For those of you who are not familiar with Utilities, it is one of the many
useful Add-Ins that is now available in ALL versions of SOLIDWORKS 2016.
Utilities contains a set of tools that allow you to analyze solid models,
modify them, and compare them with one another. One of these tools is the
Compare Tool, which can be used to compare two different SOLIDWORKS documents,
drawings, BOMs, Features and Geometry between two versions of the same file,
and identify the differences between them. In this blog, I’m going to focus on
Compare Geometry.
Compare Geometry is used to analyze two versions of a file and quickly
identify any geometric similarities and differences. This is a great tool that
works well with imported files since it only examines the geometry, and not
features of a part. It’s an easy way to compare different revisions of a file
and understand design changes as well. Compare Geometry can be done in two
ways: Volume Comparison and Face Comparison. Each of these will graphically
show you common, unique, and modified volumes/faces of the files.
Before we use the tool, we can turn on the add-in by clicking
Tools > Add-Ins, and check the box for
Utilities. Or we can simply click on
Tools > Compare > Geometry, and that
will automatically enable the Add-In and activate the Compare tool. This will
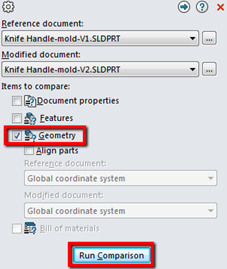
expand the tool in the Task Pane, where you can choose the two files you want
to compare from the drop down menus for
Reference document and Modified document. If
you didn’t already, have the files open you can browse for them from this
menu. Check the box for Geometry and click
Run Comparison.
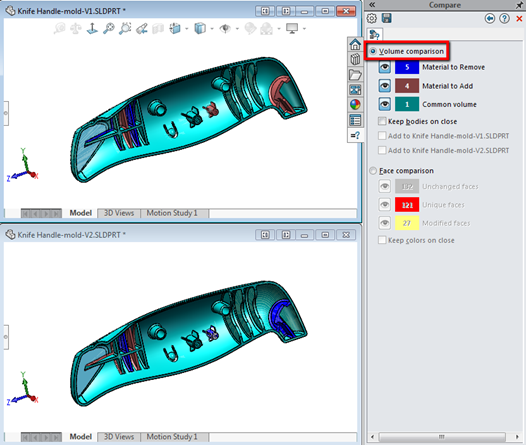
Once the tool is done processing, you can view the results as a Volume
Comparison or a Face Comparison. With the Volume comparison,
you can view any combination of Material to Remove,
Material to Add, or the Common Volume for
each part by clicking the eye button next to each of the options. Each of
these options are color coded and will highlight the different selections on
each part.
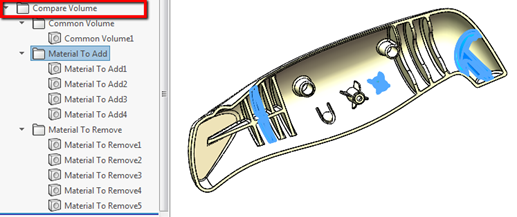
Additionally, when running a Volume Comparison, there is an option to
Keep bodies on close. What this does is save each of the
selected volumes as individual bodies in the part that you specify. This
creates a Compare Volume folder in the respective part’s FeatureManager Design
Tree, with subfolders for the volume that was added, removed, and shared.
These bodies can be used for reference, and even used in a Boolean operation
to combine into a single solid.
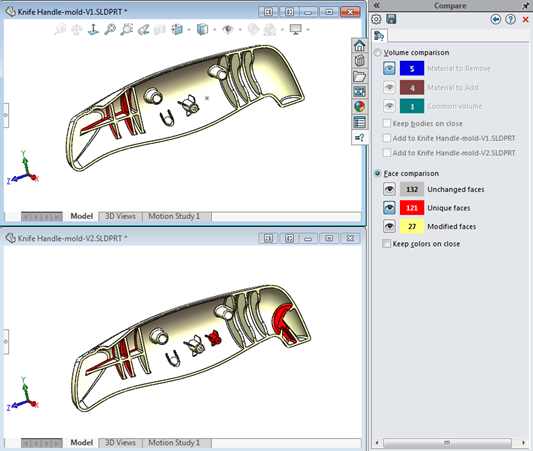
Similar steps can be used with the Face Comparison option,
where you can choose to highlight either
Unchanged faces, Unique faces, or Modified faces.
These results can be saved in a Report as an HTML file by clicking on the
Save icon at the top of the Compare Task Pane. This report
contains summaries, details, and screenshots of the comparison, and can also
be saved in the part’s Design Binder. And just like that, we can quickly see
what the difference is between two versions of the same part. Stay tuned for
the next blog, where I’ll discuss the Compare Feature tool. Also, don’t forget
to check out our
YouTube channel
for more tips & tricks!