Living in the oil and gas industrial landscape of Alberta, Canada, I use
SolidWorks Routing
almost as often as I dream of hot summer days (quite often).
However, almost all of my experience with the SolidWorks Routing tools are
built on using the default piping and tubing library installed with
SolidWorks. Even though this library has a large selection of components with
extensive configurations, no library is ever complete and there are many
different options for piping and tubing standards throughout the world. So, we
must create a custom library.
I would like to quickly discuss suggestions on creating custom routing
components and adding them to the Piping and Tubing Database.
Creating Custom Routing Components
There are two methods of creating routing components that I recommend:
1. Copy a routing component from the default SolidWorks library, or from
components downloaded from SolidWorks Content, and make the necessary changes.
If your custom component is similar to one of the default components this
works brilliantly. The SolidWorks default routing components already include
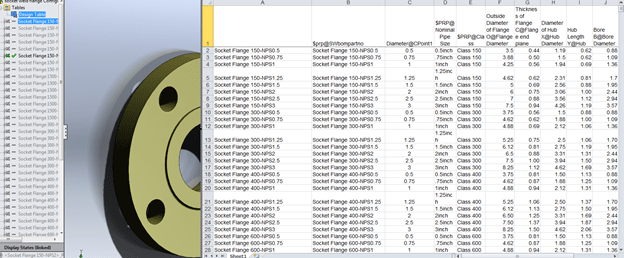
everything required for routing: C-points, R-points, sketches, etc. Looking at
the example of a flange below, you can see that they often include large
Design Tables that would make creating custom configurations quick and easy.
Please note: the C-points and R-points can be controlled with the table.
2. Run a SolidWorks component through the Routing Component Wizard (this works
for imported geometry, as well as native SolidWorks models)
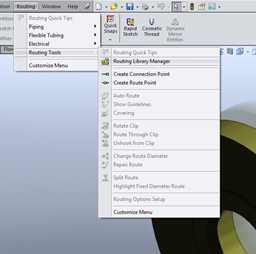
Make sure the component you wish to be transformed to a routing component is
open in SolidWorks and go to Routing-> Routing Tools-> Routing Library
Manager.
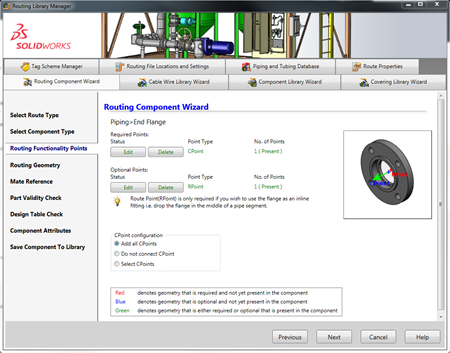
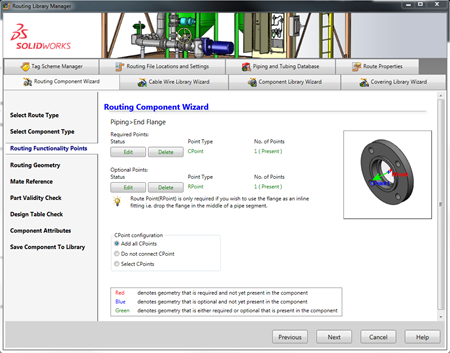
Click on the Routing Component Wizard and follow the prompts. I know it is
often hard to trust wizards sometimes (how could Saruman betray
Middle-earth??), being that their interface often seems over-simplified and
vague. However, I find the Routing Component Wizard provides a fairly clear
interface to walk you through the exact steps needed to create an intelligent
routing part or assembly (creating route
sub-assemblies with the wizard
is new to SolidWorks 2014)
The last step of this wizard allows you to add this new component to the
routing library, which makes it available within the Piping and Tubing
Database. That sure is a bonus, but what do I do if I created a component by
manually editing a SolidWorks default routing component? Or, maybe I can’t get
over my mistrust of wizards and decided to manually add routing C-Points and
R-points (Routing-> Routing Tools-> Create Connection/Route Point)?
Neither of those options automatically add the component to the Piping and
Tubing Database. Let’s take a look at how we can do this manually.
Working with the Custom Piping and Tubing Database
First of all, what does the Piping and Tubing Database actually do?
It certainly is a great interface to view all the different configurations of
your routing components, even allowing you to edit custom properties like Skey
(IsogenSkey), or Schedule. However, its origins are within the Electrical
Routing “From-To” functionality, which is used to automate the insertion of
routing components. This functionality was eventually brought to piping and
tubing and is used heavily by the P&ID import functionality to create
routes from connection points. The “From-To” functionality accesses the Piping
and Tubing Database for components and matches up corresponding data like
schedule size. This ensures that you get the matching pipe size with the
chosen flange, for example.
Personally, I find the Piping and Tubing Database most helpful when utilized
with the Route Properties tool (shown below). The ability to create Route
Property templates was revealed in SolidWorks 2012. It allows you to setup
templates with predefined pipe selections with optional elbow selections. It
can greatly decrease design time, but it does require the desired pipe and
elbow components to be available in the Piping and Tubing Database.
NOTE: In order to add components to the Piping and Tubing Database, they must
have the custom properties “Component Type” and “IsogenSkey” (this is also
imperative when exporting spools to PCF format). You can add these properties
to multiple files easily by using the Task Scheduler-> Update Custom
Properties.
Still interested in customizing your Piping and Tubing Database? Of course you
are!
Here are the steps to add custom made routing components to the Piping and
Tubing Database:
1. Add the component to the routing library location, specified in the Routing
File Locations and Settings tab within the Routing Library Manager
(Routing-> Routing Tools-> Routing Library Manager)
NOTE: The Piping and Tubing Database can only reference one location
(subfolders are allowed). If you are adding to the default location within the
SolidWorks Design Library, be aware that this location may be deleted during
uninstall of SolidWorks. Be sure to backup this location.
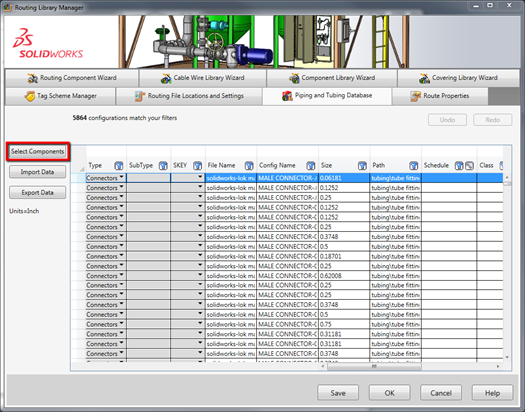
2. Go to the Piping and Tubing Database tab and click on Select Components
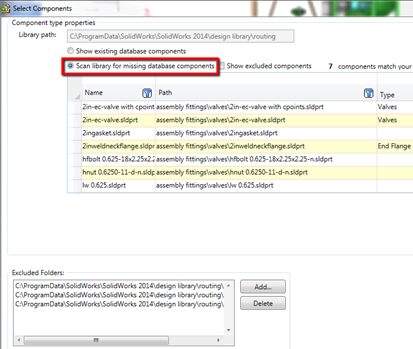
3. Select Scan library for missing database components and hit Save. This may
take a few minutes as each new component is opened in SolidWorks to obtain
metadata
4. This should take you back to the main screen within the Piping and Tubing
Database tab. Click on Save and OK
5. Make sure to thoroughly test the new components.
If you have an entire library of custom parts that you wish to dedicate the
Piping and Tubing Database to, you can follow all the steps above, but make
sure to change the file location in Step 1 to your custom parts location.
Go create some custom SolidWorks Routing libraries and have a routing good
time!


Great Ben – thanks for sharing your Wizdom!
Hi there Ben!
i’m a student, from Portugal, i’m on a some sort of Drawing/desing/engineering of mecanical elements type of course (can’t translated right) in the exact words its “Desenho e Projectos de Construções Mecânicas” -> Drawings and Projects of Mecanics Constructions……well that’s a bit odd. (its not an Engineering level [university])
I use AutoCad and SW, i’m a NewBlood in SW, i got the basics, so lately i’m very interested in piping desing/constructions/projecting etc.. like to expand my horizons.
– So i was doing tutorials but i did some thing wrong i deleted the Standard elbow part from the routing options menager thingy and now i don’t remember wich elbow was it plus i already make a costume template and options template, so i lost the old one (yeah i know, stupid me). so now when i made and routing sketch when it has an elbow it does an error: “No matching configurations are available for elbow “link of the part” please customize your template and see all available configurations”.
oh and I want to have the ISO/DIN library parts, i use europe standards, all my template are by ISO standards.
– I notice that there is a tab on the routing menager that you can upload parts into it, i was trying to upload all ISO and DIN parts and wanted to put them into the default/standard parts options, but i don’t know how to do it.
I would like to have for example:
DIN/ISO template (routing.sldasm, routing config’s(options) -> linked with the DIN/ISO parts (tees, flanges tubes/pipes etc) ->folder
ANSI templates (routing.sldasm, routing config’s(options) -> linked with the ANSI parts (tees, flanges tubes/pipes etc) ->folder
something well organized. I dunno if it is possible, like i said i’m a newb here.
Good tutorial by the way!
Best regards
JHG
Hi again!
Well forgot about anything i said……its resolved, sorry just clicked on the the “load default” botton (i’m soooo smart).
but I still wanted everything well organized at least my way, so:
(standard) Routing.sldasm
|_ (standard) routing.sqy ( routing configs/options)
|_(standard) components Folder (tees, flanges, pipes, reducers etc)
For example, each time i open an ISOrouting assembly, it has the ISOrouting.sqy and only the ISO parts in the wizard thingy, don’t wanna see ANSI elements in it(and vice versa), its unnecessary data flowing into the menager and running thru SW plus its much “cleaner”/organized to see and work with it, that way.
1 more thing, we to identify the pipes we dont use the schedule, we use the Standard (occasionally), Outside Diameter and the wall Thickness. so i saw at the menager selection that said schedule, but if i chose ISO we don’t use schedule. so its a bit confusing to me.
well i think is only me because i’m a rookie on this (and a-wanna-be engineer, maybe)
Best regards
JHG
Hi there..
Well, I’m wondering if I want to do a routing, should I buy a solidworks premium version or the standard version could do the routing also?
since I’m using the standard version right now
Thank you..
Best Regards
Fredric
Hi Ben
thanks for your reply my previous question.
I’ve already installed the premium version, but there is a warning says “cannot access the database file:C:\ProgramData\Solidworks\Solidworks 2014\design library\routing\RoutingLib.db. Please ensure it has write access.Attempt to write a read-only database attempt towrite a readonly database” when I tried to open the piping and tubing database in SW Routing Library Manager. The RoutingLib.db is already in the same directory but the RoutingLib is in the small word, could u please tell how to fix this problem ?
and one more question. When I open the route properties in SW Routing Library Manager, there are Pipe, Bends-Elbows, which already default with the schedule pipe and so on. But I want to use Stainless steel pipe which I downloaded from SW contents, however everytime I want to browse the pipe the warning as the above is shown too and after I click ok, then the Routing Library Manager is close right away. How I change the type of pipe since I don’t want to use schedule pipe?
I just wondering, is it possible for you to make another article about how to import database if they do not create a custom part but they download the routing part from SW content like me and change the route properties to use the downloaded routing part. For instance there are somebody has same trouble like me. If u could do that it might be very helpful..
Thank U..
Best Regards
Fredric.
Hi sir,
thanks for your video .
can you please tell me how to make bill of material for routing components for different materials like 304SS, 316SS, 316LSS with item number which generally used by our company.
please give me guidance
thanking you…
I got what you intend,bookmarked, very nice site.
I blog often and I really appreciate your content.
This great article has truly peaked my interest.
I’m going to bookmark your website and keep checking for new
details about once per week. I opted in for your RSS feed
too.
Hello Fredric,
Thank you for commenting, this is a great question to bring up. It is SOLIDWORKS Premium that includes the automated pipe and tube routing functionality. The Routing Components and Piping and Tubing Database that my blog article discusses are both based on the SOLIDWORKS Premium Routing tool. Please visit our Product Matrix page to view a comparison between the SOLIDWORKS product lines: SOLIDWORKS Product Matrix
Kind regards,
Ben